了解需求
如果不想看过程,可以跳到最后查看完整代码
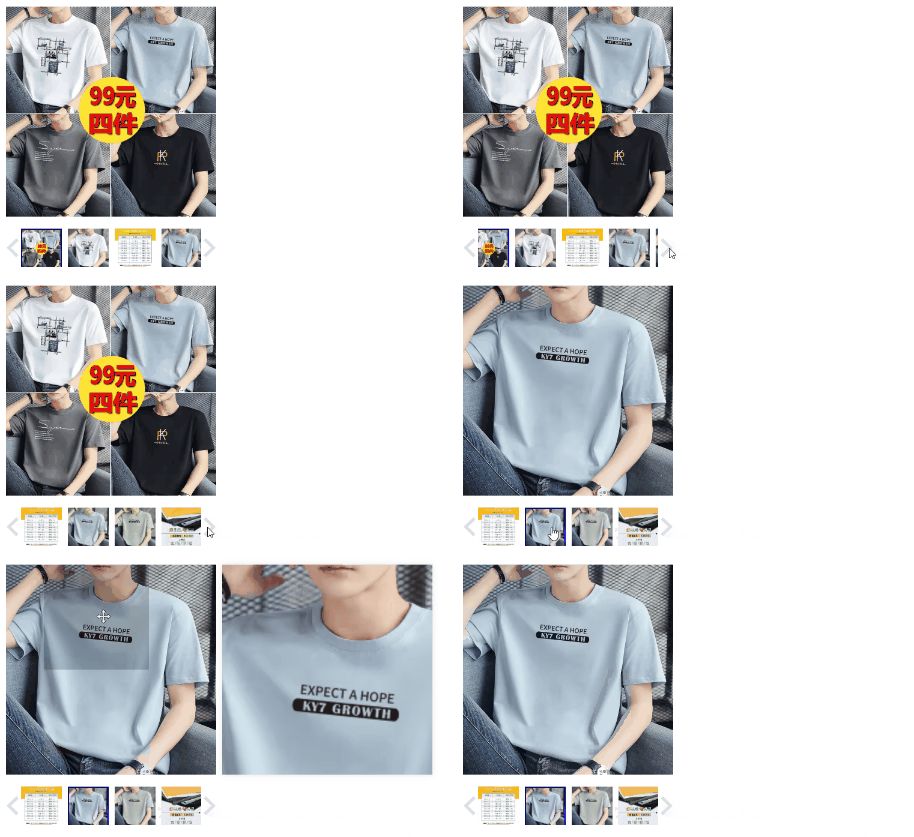
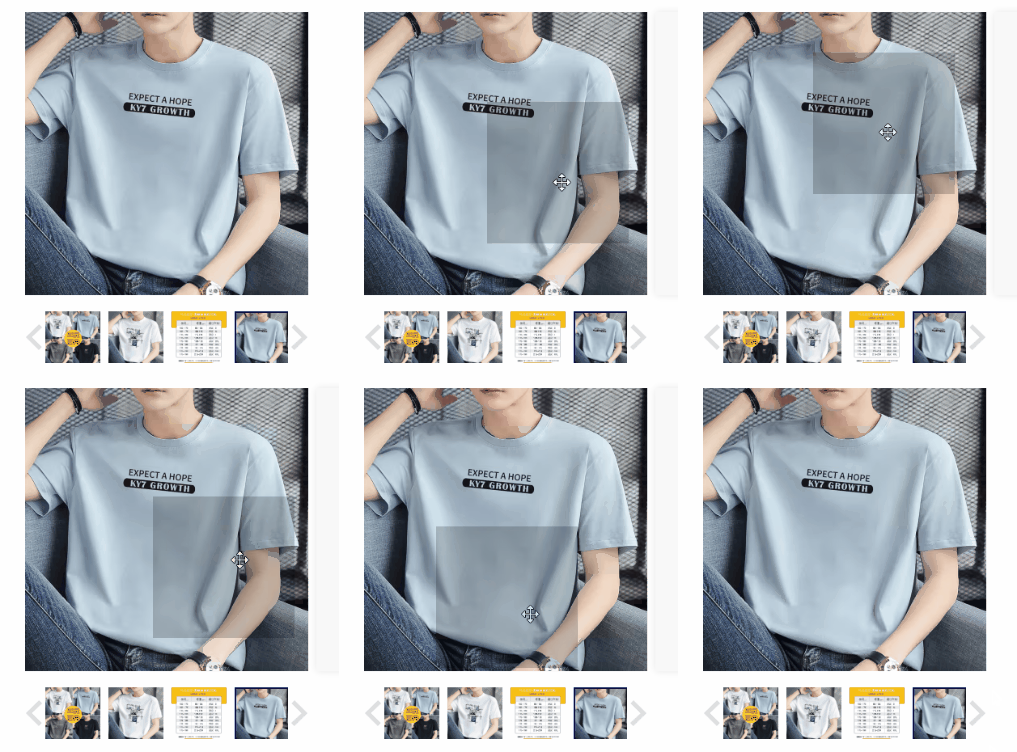
原理大概是将 预览大图 先放大两倍,然后将宽度和高度设置其一半,通过 backgroundPositionX 和 backgroundPositionY 实现显示的移动。
效果:

- 1、分为三个部分
- 左边的预览大图
- 中间是缩放大图和鼠标进入图片的遮罩层
- 右边的缩略小图
- 2、流程
- 鼠标放在 缩略小图 上切换 预览大图
- 鼠标放在 商品大图 上显示 缩放大图和遮罩层
基础结构
我们首先完成,流程中的一个功能,但鼠标放在缩略小图上切换左边的商品大图
- 很好,现在基础结构出来了
<template>
  <div class="goods-image">
    <!-- 商品大图 -->
    <div class="left-layer">
      <!-- 商品大图 -->
      <img ref="target" :src="images[currIndex]" alt="" />
      <!-- 鼠标进入图片的遮罩 -->
      <div v-show="show" class="mask"></div>
    </div>

    <!-- 预览大图 -->
    <div v-show="show" class="middle-large"></div>

    <!-- 缩略小图 -->
    <div class="right-small">
      <i class="sprite-arrow-prev"></i>
      <div class="small-list">
        <ul>
          <li
            v-for="(img, index) in images"
            :key="img"
            :class="{ active: index === currIndex }"
          >
            <!-- 鼠标移入商品大图旁边的小图商品大图位置就会显示该图 -->
            <img :src="img" alt="" @mouseenter="currIndex = index" />
          </li>
        </ul>
      </div>
      <i class="sprite-arrow-next"></i>
    </div>
  </div>
</template>
<script setup lang="ts">
  import { reactive, ref } from "vue";

  // 数据
  let images = reactive([
    "https://img14.360buyimg.com/n1/jfs/t1/66849/10/23135/160781/638b72b0Ea03cea8d/653c754c7625c8e8.jpg.avif",
    "https://img14.360buyimg.com/n1/jfs/t1/211047/28/28923/167332/638b6700Ec8270fba/2181a981d700b28b.jpg.avif",
    "https://img14.360buyimg.com/n1/jfs/t1/81014/33/23792/82768/6391e605Ee23b8b48/429c8d0a219f92f0.jpg.avif",
    "https://img14.360buyimg.com/n1/jfs/t1/56449/13/21802/155724/638a1443E3f1f85d0/15e871165c3556cf.jpg.avif",
    "https://img14.360buyimg.com/n1/jfs/t1/172426/17/31522/107400/63995d50Ec35ab021/4c8308d438f7ded9.jpg.avif",
    "https://img14.360buyimg.com/n1/jfs/t1/140219/8/9788/150562/5f74a96dE82177b05/98cc27027f9c2806.jpg.avif",
    "https://img14.360buyimg.com/n1/jfs/t1/185475/8/29348/174837/638a1449E39145a0f/cab1ffd0cfb5c077.jpg.avif",
  ]);

  // 商品大图的索引
  const currIndex = ref(0);
  // 大图中遮罩层的显示
  const show = ref(true);
</script>

<style scoped lang="scss">
  .goods-image {
    display: block;
    width: 350px;
    height: 350px;
    position: relative;
    z-index: 500;

    .left-layer {
      width: 350px;
      height: 350px;
      position: relative;
      cursor: move;

      .mask {
        width: 175px;
        height: 175px;
        background: rgba(0, 0, 0, 0.2);
        left: 0;
        top: 0;
        position: absolute;
      }
    }

    .middle-large {
      position: absolute;
      top: 0;
      left: 360px;
      width: 350px;
      height: 350px;
      box-shadow: 0 0 10px rgba(0, 0, 0, 0.1);
      background-repeat: no-repeat;
      background-size: 700px 700px;
      background-color: #f8f8f8;
    }

    .right-small {
      display: flex;
      align-items: center;
      justify-content: space-between;
      width: 100%;
      margin: 20px auto 0 auto;

      .sprite-arrow-prev {
        display: block;
        width: 22px;
        height: 32px;
        background: url(https://storage.jd.com/retail-mall/item/pc/unite/1.0.176/components/default-soa/preview/i/disabled-prev.png);
      }

      .sprite-arrow-next {
        display: block;
        width: 22px;
        height: 32px;
        background: url(https://storage.jd.com/retail-mall/item/pc/unite/1.0.176/components/default-soa/preview/i/disabled-next.png);
      }

      .small-list {
        position: relative;
        width: 300px;
        height: 64px;
        overflow: hidden;

        ul {
          position: absolute;
          left: 0;
          top: 0;
          display: flex;
          gap: 10px;
        }

        li {
          width: 68px;
          height: 68px;
          cursor: pointer;
          &:hover,
          &.active {
            border: 2px solid blue;
          }
          img {
            width: 100%;
            height: 100%;
          }
        }
      }
    }
  }
</style>
获取缩放图鼠标 XY
- 首先我们借助
@vueuse/core完成
pnpm i @vueuse/core
第一步:判断鼠标在 预览大图 中并且获取 XY 坐标
- 第一步:判断鼠标在 预览大图 中并且获取 XY 坐标
- 现在我们能获取到当鼠标进入图片时,他的坐标了。
<!-- 商品大图 -->
<div class="left-layer">
  <!-- 商品大图 -->

  <!-- 注意! ref 设置在这里 -->
  <img ref="target" :src="images[currIndex]" alt="" />
  <!-- 注意! ref 设置在这里 -->

  <!-- 鼠标进入图片的遮罩 -->
  <div v-show="show" class="mask"></div>
</div>
import { reactive, ref, watch } from "vue";
import { useMouseInElement } from "@vueuse/core";

// ref 获取 DOM 元素
const target = ref(null);

// 遮罩坐标
const position = reactive({
  top: "0",
  left: "0",
});

// 预览大图的坐标位置
const bgPosition = reactive({
  backgroundPositionX: "0",
  backgroundPositionY: "0",
});

// 获取鼠标在某块区域的坐标
const { elementX, elementY, isOutside } = useMouseInElement(target);
watch([elementX, elementY, isOutside], () => {
  // 鼠标未进入目标元素不显示遮罩层和预览大图
  if (isOutside.value) {
    show.value = false;
    return;
  }

  console.log(elementX, elementY);

  // 显示遮罩层和预览大图
  show.value = true;
});
移动遮罩层
- 第二步:移动遮罩层

<!-- 商品大图 -->
<div class="left-layer">
  <!-- 商品大图 -->
  <img ref="target" :src="images[currIndex]" alt="" />

  <!-- 注意! style 设置在这里 -->
  <!-- 鼠标进入图片的遮罩 -->
  <div v-show="show" class="mask" :style="[position]"></div>
  <!-- 注意! style 设置在这里 -->
</div>
watch([elementX, elementY, isOutside], () => {
  // 鼠标未进入目标元素不显示遮罩层和预览大图
  if (isOutside.value) {
    show.value = false;
    return;
  }

  console.log(elementX, elementY);

  // 显示遮罩层和预览大图
  show.value = true;

  position.top = position.top.replace("px", "");
  position.left = position.left.replace("px", "");

  // X轴
  if (elementX.value < 100) {
    position.left = "0";
  } else if (elementX.value > 275) {
    position.left = "175";
  } else {
    position.left = String(elementX.value - 100);
  }

  // Y轴
  if (elementY.value < 100) {
    position.top = "0";
  } else if (elementY.value > 275) {
    position.top = "175";
  } else {
    position.top = String(elementY.value - 100);
  }

  // 遮罩层相对于商品大图左上角坐标,加单位
  position.top += "px";
  position.left += "px";
});
完成预览大图
<!-- 预览大图 -->
<div
  v-show="show"
  class="middle-large"
  :style="[{ backgroundImage: `url(${images[currIndex]})` }, bgPosition]"
></div>
- 在 Watch 里面添加这个就可以了
// 遮罩层所覆盖的商品图片部分在预览大图中的坐标,加单位
bgPosition.backgroundPositionY = -Number(position.top) * 2 + "px";
bgPosition.backgroundPositionX = -Number(position.left) * 2 + "px";
预览小图切换
<!-- 缩略小图 -->
<div class="right-small">
  <i class="sprite-arrow-prev" @click="smallClickPrev"></i>
  <div class="small-list">
    <ul ref="smallList" :style="[smallListStyle]">
      <li
        v-for="(img, index) in images"
        :key="img"
        :class="{ active: index === currIndex }"
      >
        <!-- 鼠标移入商品大图旁边的小图商品大图位置就会显示该图 -->
        <img :src="img" alt="" @mouseenter="currIndex = index" />
      </li>
    </ul>
  </div>
  <i class="sprite-arrow-next" @click="smallClickNext"></i>
</div>
// 预览小图列表切换
const smallListStyle = reactive({
  transform: "translateX(0)",
  transition: "all .5s",
});
const smallList = ref<HTMLElement>();
let smallClickNext = () => {
  let transformX = Number(smallListStyle.transform.match(/[\d]+/g));

  if (transformX < smallList.value?.clientWidth - 68 - 350) {
    smallListStyle.transform = `translateX(-${transformX + 78}px)`;
  }
};

let smallClickPrev = () => {
  let transformY = Number(smallListStyle.transform.match(/[\d]+/g));

  if (transformY - 78 >= 0) {
    smallListStyle.transform = `translateX(-${transformY - 78}px)`;
  }
};
总结
<template>
  <div class="goods-image">
    <!-- 商品大图 -->
    <div class="left-layer">
      <!-- 商品大图 -->
      <img ref="target" :src="images[currIndex]" alt="" />
      <!-- 鼠标进入图片的遮罩 -->
      <div v-show="show" class="mask" :style="[position]"></div>
    </div>

    <!-- 预览大图 -->
    <div
      v-show="show"
      class="middle-large"
      :style="[{ backgroundImage: `url(${images[currIndex]})` }, bgPosition]"
    ></div>

    <!-- 缩略小图 -->
    <div class="right-small">
      <i class="sprite-arrow-prev" @click="smallClickPrev"></i>
      <div class="small-list">
        <ul ref="smallList" :style="[smallListStyle]">
          <li
            v-for="(img, index) in images"
            :key="img"
            :class="{ active: index === currIndex }"
          >
            <!-- 鼠标移入商品大图旁边的小图商品大图位置就会显示该图 -->
            <img :src="img" alt="" @mouseenter="currIndex = index" />
          </li>
        </ul>
      </div>
      <i class="sprite-arrow-next" @click="smallClickNext"></i>
    </div>
  </div>
</template>
<script setup lang="ts">
  import { reactive, ref, watch } from "vue";
  import { useMouseInElement } from "@vueuse/core";

  // 数据
  let images = reactive([
    "https://img14.360buyimg.com/n1/jfs/t1/66849/10/23135/160781/638b72b0Ea03cea8d/653c754c7625c8e8.jpg.avif",
    "https://img14.360buyimg.com/n1/jfs/t1/211047/28/28923/167332/638b6700Ec8270fba/2181a981d700b28b.jpg.avif",
    "https://img14.360buyimg.com/n1/jfs/t1/81014/33/23792/82768/6391e605Ee23b8b48/429c8d0a219f92f0.jpg.avif",
    "https://img14.360buyimg.com/n1/jfs/t1/56449/13/21802/155724/638a1443E3f1f85d0/15e871165c3556cf.jpg.avif",
    "https://img14.360buyimg.com/n1/jfs/t1/172426/17/31522/107400/63995d50Ec35ab021/4c8308d438f7ded9.jpg.avif",
    "https://img14.360buyimg.com/n1/jfs/t1/140219/8/9788/150562/5f74a96dE82177b05/98cc27027f9c2806.jpg.avif",
    "https://img14.360buyimg.com/n1/jfs/t1/185475/8/29348/174837/638a1449E39145a0f/cab1ffd0cfb5c077.jpg.avif",
  ]);

  // 商品大图的索引
  const currIndex = ref(0);
  // 大图中遮罩层的显示
  const show = ref(true);
  // 商品大图的 Ref
  const target = ref<HTMLElement>();

  // 遮罩坐标
  const position = reactive({
    top: "0",
    left: "0",
  });

  // 预览大图的坐标位置
  const bgPosition = reactive({
    backgroundPositionX: "0",
    backgroundPositionY: "0",
  });

  // 列表切换
  const smallListStyle = reactive({
    transform: "translateX(0)",
    transition: "all .5s",
  });
  const smallList = ref<HTMLElement>();
  let smallClickNext = () => {
    let transformX = Number(smallListStyle.transform.match(/[\d]+/g));

    if (transformX < smallList.value?.clientWidth - 68 - 350) {
      smallListStyle.transform = `translateX(-${transformX + 78}px)`;
    }
  };

  let smallClickPrev = () => {
    let transformY = Number(smallListStyle.transform.match(/[\d]+/g));

    if (transformY - 78 >= 0) {
      smallListStyle.transform = `translateX(-${transformY - 78}px)`;
    }
  };

  // 获取鼠标在某块区域的坐标
  const { elementX, elementY, isOutside } = useMouseInElement(target);
  watch([elementX, elementY, isOutside], () => {
    // 鼠标未进入目标元素不显示遮罩层和预览大图
    if (isOutside.value) {
      show.value = false;
      return;
    }

    // 显示遮罩层和预览大图
    show.value = true;

    position.top = position.top.replace("px", "");
    position.left = position.left.replace("px", "");

    // X轴
    if (elementX.value < 100) {
      position.left = "0";
    } else if (elementX.value > 275) {
      position.left = "175";
    } else {
      position.left = String(elementX.value - 100);
    }

    // Y轴
    if (elementY.value < 100) {
      position.top = "0";
    } else if (elementY.value > 275) {
      position.top = "175";
    } else {
      position.top = String(elementY.value - 100);
    }

    // 遮罩层所覆盖的商品图片部分在预览大图中的坐标,加单位
    bgPosition.backgroundPositionY = -Number(position.top) * 2 + "px";
    bgPosition.backgroundPositionX = -Number(position.left) * 2 + "px";

    // 遮罩层相对于商品大图左上角坐标,加单位
    position.top += "px";
    position.left += "px";
  });
</script>

<style scoped lang="scss">
  .goods-image {
    display: block;
    width: 350px;
    height: 350px;
    position: relative;
    z-index: 500;

    img {
      width: 100%;
      height: 100%;
      object-fit: contain;
    }

    .left-layer {
      width: 100%;
      height: 350px;
      position: relative;
      cursor: move;

      .mask {
        width: 50%;
        height: 50%;
        background: rgba(0, 0, 0, 0.2);
        left: 0;
        top: 0;
        position: absolute;
      }
    }

    .middle-large {
      position: absolute;
      top: 0;
      left: 360px;
      width: 350px;
      height: 350px;
      box-shadow: 0 0 10px rgba(0, 0, 0, 0.1);
      background-repeat: no-repeat;
      background-size: 700px 700px;
      background-color: #f8f8f8;
    }

    .right-small {
      display: flex;
      align-items: center;
      justify-content: space-between;
      width: 100%;
      margin: 20px auto 0 auto;

      .sprite-arrow-prev {
        display: block;
        width: 22px;
        height: 32px;
        background: url(https://storage.jd.com/retail-mall/item/pc/unite/1.0.176/components/default-soa/preview/i/disabled-prev.png);
      }

      .sprite-arrow-next {
        display: block;
        width: 22px;
        height: 32px;
        background: url(https://storage.jd.com/retail-mall/item/pc/unite/1.0.176/components/default-soa/preview/i/disabled-next.png);
      }

      .small-list {
        position: relative;
        width: 300px;
        height: 64px;
        overflow: hidden;

        ul {
          position: absolute;
          left: 0;
          top: 0;
          display: flex;
          gap: 10px;
        }

        li {
          width: 68px;
          height: 68px;
          cursor: pointer;
          &:hover,
          &.active {
            border: 2px solid blue;
          }
          img {
            width: 100%;
            height: 100%;
          }
        }
      }
    }
  }
</style>